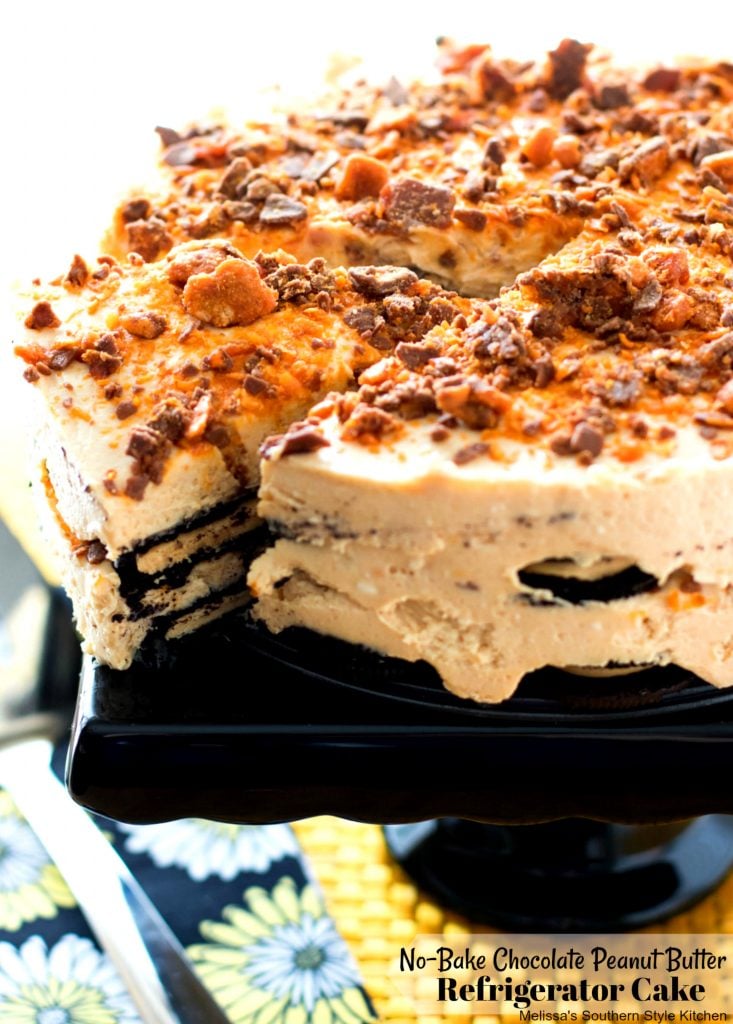
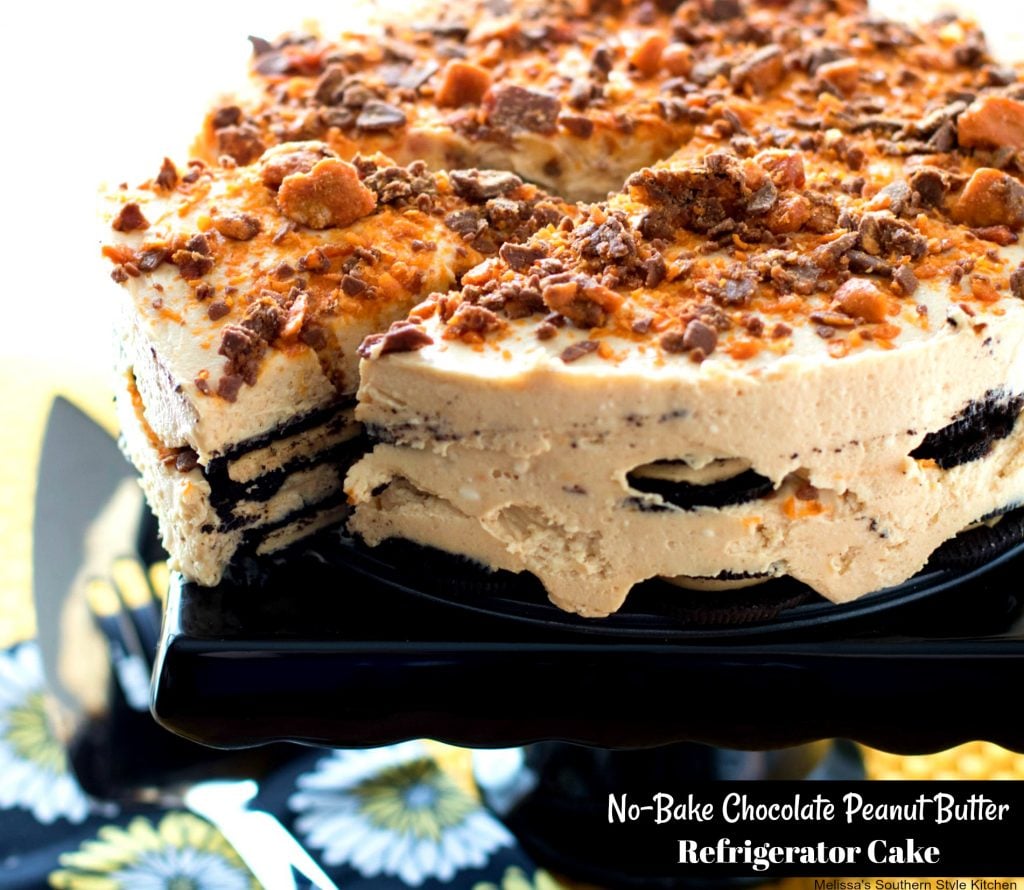
Chocolate Peanut Butter Refrigerator Cake
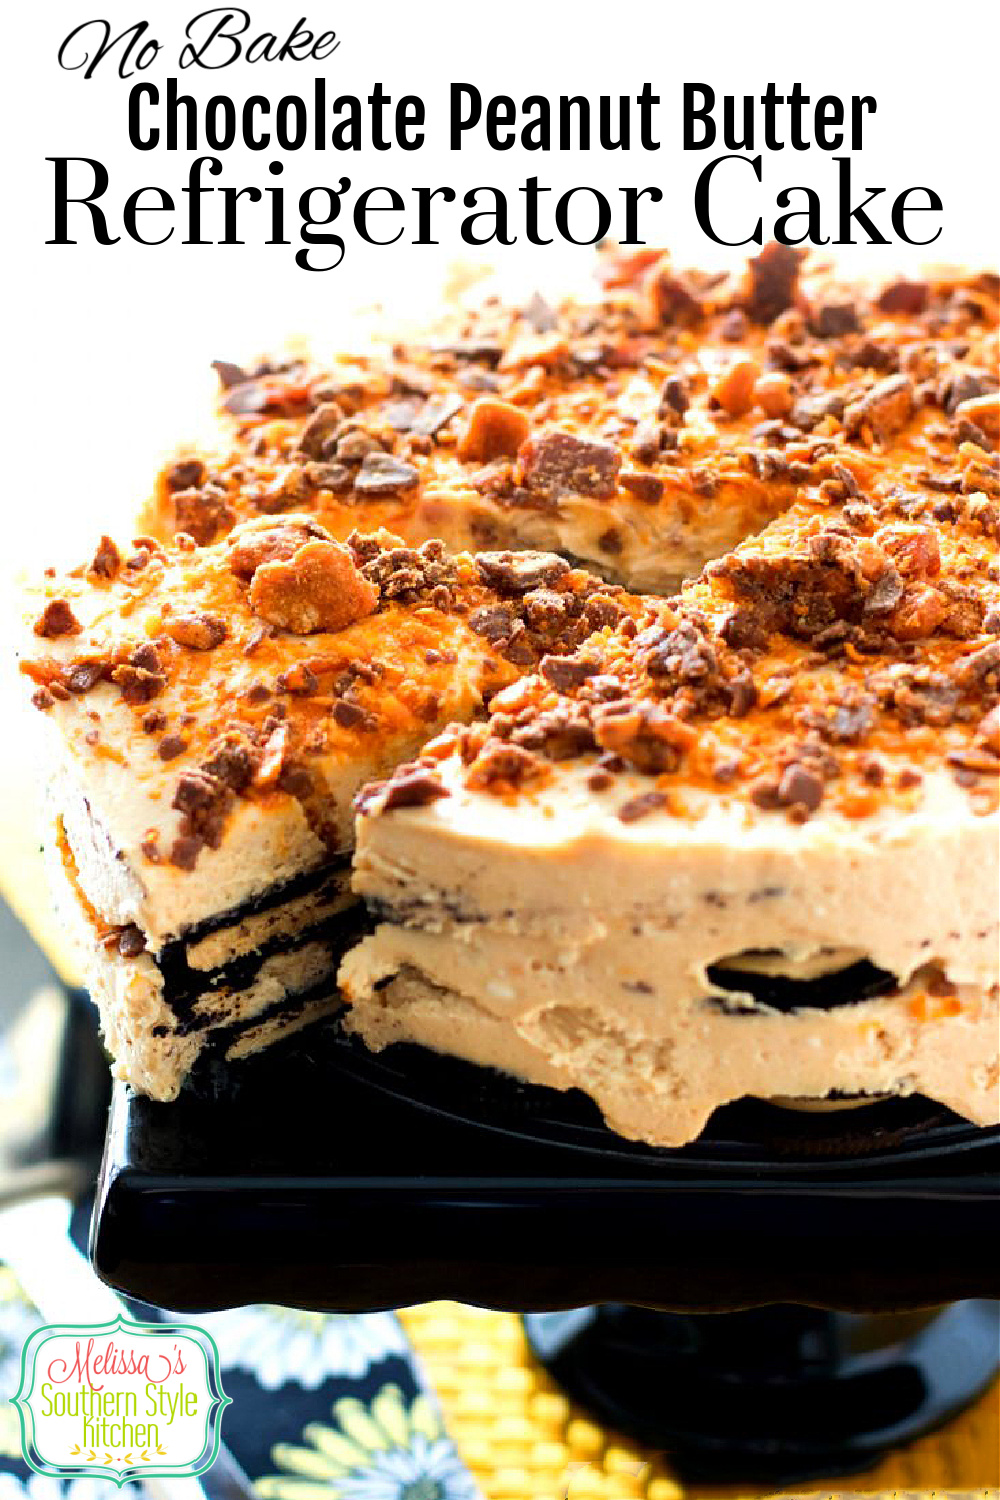
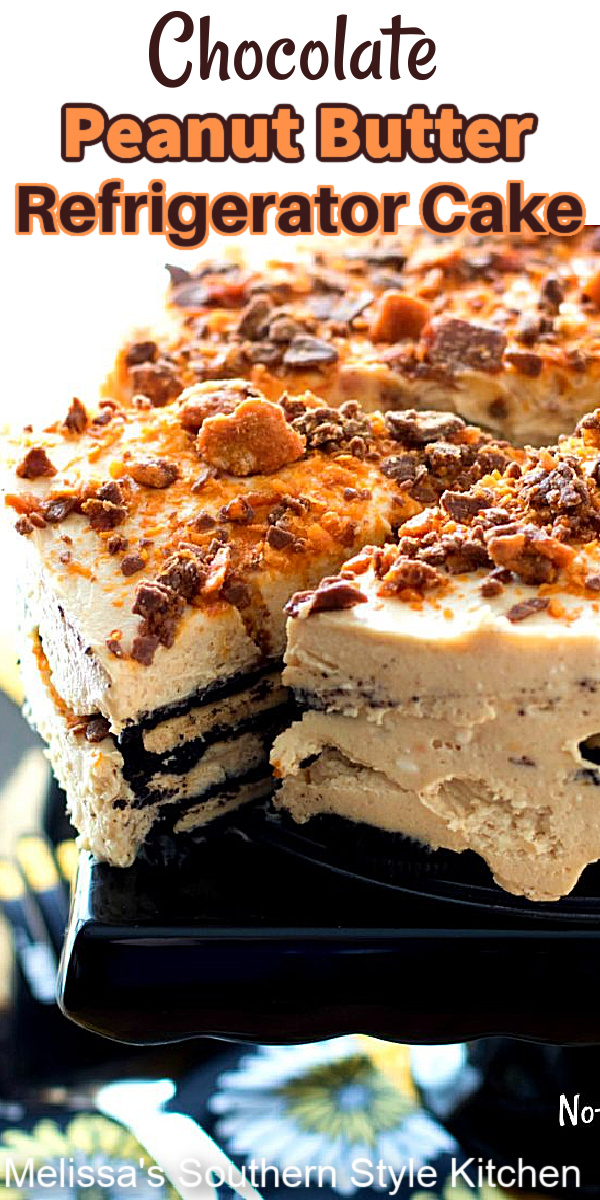

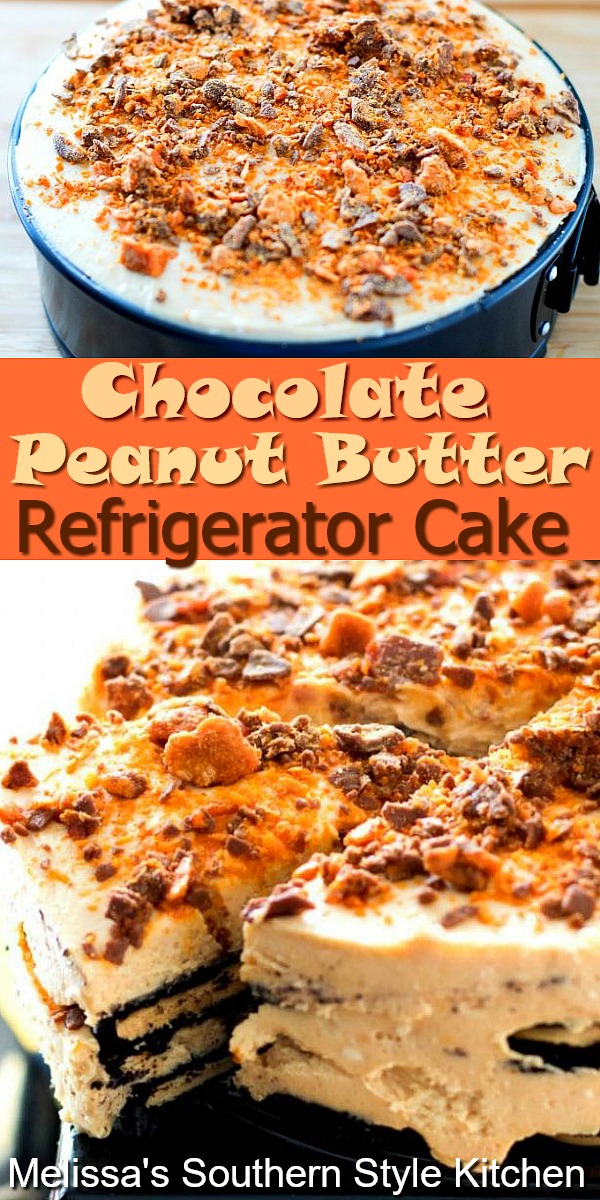
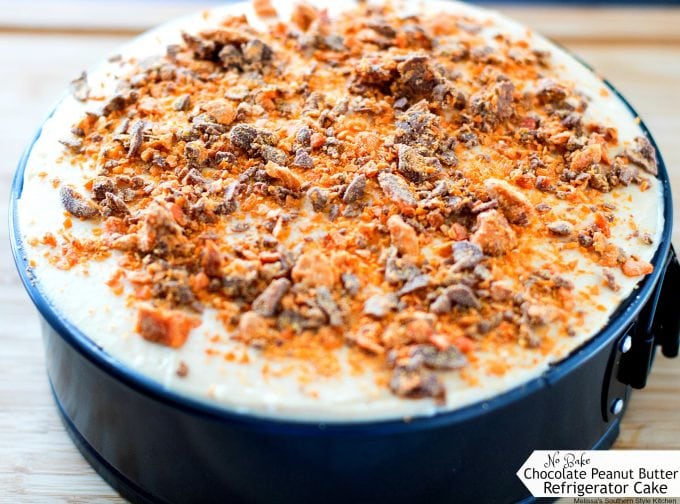
This no bake Chocolate Peanut Butter Refrigerator Cake features layers of peanut butter stuffed Oreo cookies and a fluffy peanut butter filling. The top is sprinkled with crushed Butterfinger candy bar pieces for a little extra crunch. Cut it into wedges and serve as is or, with a dollop of whipped cream for a spectacular treat.
Easy No Bake Chocolate Peanut Butter Refrigerator Cake Recipe
No fuss desserts like this chocolate peanut butter refrigerator cake are quick, easy and magically delicious. Perhaps it’s the ease of preparation that makes them taste even better. It’s perfect for so many reasons not the least of which is the fact it actually needs to be made in advance so it has time to set-up to perfection. How to make Chocolate Peanut Butter Refrigerator Cake: (Scroll down for full printable recipe.)
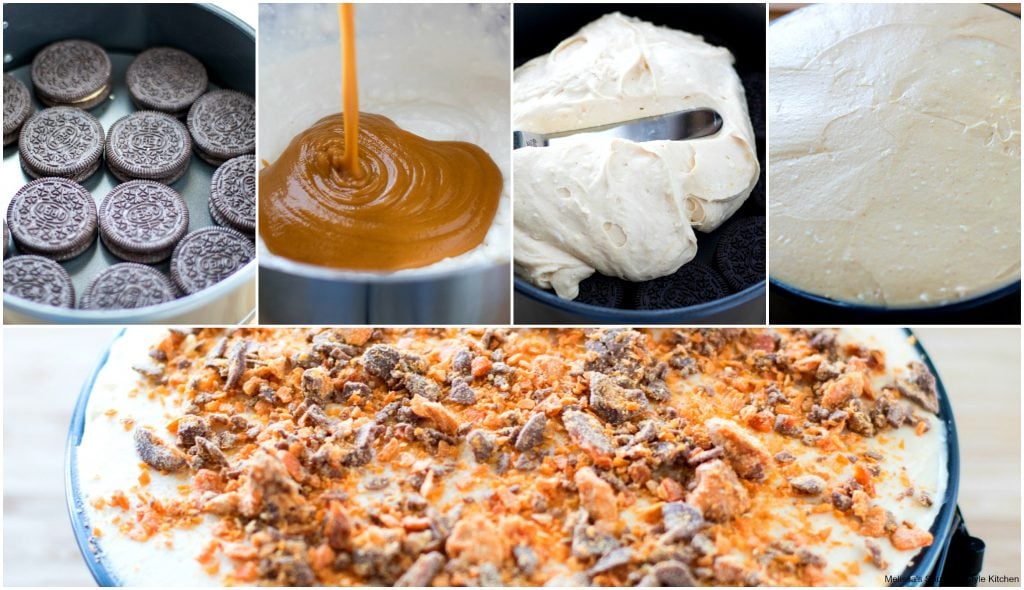
- Melt Peanut Butter Chips – Melt together the peanut butter chips with cream. Melt in 20 second increments stopping to stir each time. Repeat until completely smooth. Set aside to cool slightly.
- Creamed Ingredients – Using an electric mixer whip together cream, cream cheese, marshmallow fluff and vanilla. Beat until combined and beginning to thicken to soft peaks.
- Combine – To the bowl whip in the melted peanut butter chips. Continue to whip until stiff peaks form.
- Assemble – Arrange 1/2 of the cookies flat, side by side on the bottom of an 8-inch springform pan. Spread 1/2 of the filling evenly over the cookies. Sprinkle with 1/2 of the crushed Butterfinger candy. Repeat layers.
- Refrigerate – Cover with plastic wrap and chill for 8 hours or overnight.
- Serve- Remove outer ring and slice into desired size wedges.
How to Make the Best Chocolate Peanut Butter Refrigerator Cake
Refrigerator cakes have many faces. Some are made in a 13 x 9-inch dish using crushed cookie crumbs as the “cake” or sometimes they’re square. They’re easy to make without turning on the oven, it doesn’t get any better than that.
- Ingredients you’ll need to make homemade Chocolate Peanut Butter Refrigerator Cake: Peanut butter Oreos, peanut butter baking chips, whipped topping (i.e. Cool Whip or similar) plain cream cheese, heavy cream, marshmallow cream, vanilla extract and crushed Butterfinger candy bars.
- Kitchen tools you’ll need: One 8 inch springform pan, small microwave safe bowl, medium bowl, stand mixer or hand mixer, measuring cups and spoons.
- This particular chocolate peanut butter version I love to make using a round 8-inch springform pan. To serve, it’s cut into wedges like a pie making it ideal for smaller gatherings.
- Peanut butter filled Oreo cookies form the “cake” layer. If you’re unable to find them classic Oreos will work.
- Allow ample time for the cake to chill and set before attempting to cut into pieces. It’s perfect for make-ahead preparation.
- Refrigerator cakes are often considered warm weather desserts but, in my kitchen they’re truly a year-round confection. If you pan on serving this on a warm day, leave it chilled as long as possible and remove from the fridge or cooler just before serving.
- Easy and delicious this can be adapted and made in a 9 x 9 inch square pan or doubled and made in a 9 x 13-inch dish for a larger gathering or potluck party.
- A dollop of whipped cream is a nice touch, but completely optional.
- Store Chocolate Peanut Butter Refrigerator Cake chilled in the refrigerator for up to 4 days.
More No Bake Desserts to Make
- Always a fan favorite, this Chocolate Peanut Butter Cup Lasagna makes it completely acceptable to have lasagna for dessert.
- This No Bake Fluffy Cherry Cheesecake is a classic just like my Grandma used to make.
- No Bake Banana Pudding Pie will satisfy your banana pudding cravings.
- Tropical Cheesecake Dip is a delicious option when tailgating or casual desserts are on the menu.
- No Bake Lemon Bliss Cheesecake.
- Peanut Butter Mallow Bars are filled with mini marshmallows.
- You may also enjoy this recipe for Red, White and Blue Cheesecake Salad from The Slow Roasted Italian.
Thanks for visiting come back soon!
Disclosure ~ If a purchase is made using one of the affiliate links on this website we may earn a small commission at no additional cost to you. Thank you!
Helpful Kitchen Items:
Chocolate Peanut Butter Refrigerator Cake
Ingredients
- 1 10 oz package peanut butter baking chips
- 3 cups heavy cream divided
- 1 15.25 oz package Oreo Peanut Butter Cream
- 1 8 oz block cream cheese, softened
- 1 7 oz container marshmallow fluff
- 2 tsp pure vanilla extract
- 2 full size Butterfinger candy bars crushed
Instructions
- Filling: In a small microwave safe bowl melt together the peanut butter chips with 1/2 cup heavy cream. Melt in 20 second increments stopping to stir each time. Repeat until completely smooth. Set aside to cool slightly.
- In a medium size mixing bowl using an electric mixer whip together 2 1/2 cups cream, cream cheese, marshmallow fluff and vanilla. Beat at medium speed until combined and beginning to thicken to soft peaks.
- Lower the speed of the mixer and whip in the melted peanut butter chips. Continue to whip until stiff peaks form.
- Assemble: Arrange 1/2 of the cookies flat, side by side on the bottom of an 8-inch springform pan. There will be gaps.
- Spread 1/2 of the filling evenly over the cookies. Sprinkle with 1/2 of the crushed Butterfinger candy. Repeat layers. Cover with plastic wrap and chill for 8 hours or overnight.
- Serve: Remove outer ring and use a sharp knife to slice into wedges.
- Store leftovers chilled.
I want to make this gluten free. If I used regular gf Oreos (they don’t come in peanut butter) do you think there would be enough peanut butter taste with just the melted chips?
I think you’d still get the peanut butter flavor, just not as pronounced.
I just made this and mine was runny. I added some cornstarch to it in hopes that it will thicken up by tomorrow. But wondering what I did wrong…. making another dessert as a back up as I am not confident in the outcome. Any advice for next time would greatly be appreciated.
While it shouldn’t be runny if beaten well, it does take time for the filling to chill and set, as directed in the recipe. To set up, it has to chill for at least 8 hours or overnight. I’ve never added cornstarch to this dessert so, I really have no advice about how that will work out.
I need this for a larger group of people and you had said a 9×13 pan can be used. So does it need to be doubled?
Yes, you will need to double for a larger pan.
Could you include a calorie count per slice? Just kidding–I don’t want to know. 🙂 Looks scrumptious.
Haha, thanks!
I just tried making this and the cream mixture was way too runny. I thought I went right by the recipe. Any thoughts? Thanks
It shouldn’t have been super runny but it is soft and spreadable. It sets-up when chilled.
Whoa! This looks incredible! 🙂 Perfect for summer.
Thank you!